Anne shares with us a quick synopsis of the steps she takes to create her tourmaline cabochon fabulous earrings!
We hope the tutorial will serve to inspire you to create! No matter if you just get out your sketch book and draw a similar project based on these challenges. It’s a place to start. It’s a way to start off your day in the right frame of mind with a creative exercise!
Anne says “I was given a syringe of PMC3 and a package of PMC+ and was told to make something. I took this challenge at it’s word and really made a HUGE effort to not add to the materials list (all that much).
I went shopping in Tucson and saw some very interesting ethnic jewelry and I fell in love with this table of earrings and spent about 15 minutes and made some fast and furious sketches.
I knew that I wanted to make earrings and I knew that I wanted to keep to the old adage… Less is more!”
If you are interested in the full step-by-step tutorial please stay tuned. It will be available at Whole Lotta Whimsy. They will be in a handy bench format too! This tutorial looks like it will be over 30 pictures with tons of detail in this #50 Tutorial!
In this tutorial you will learn:
- How to use syringe to extrude wire
- How to use syringe to earrings
- How to use fine silver wire and discs for stone setting
- How to set a cabochon with a captured setting
- How to solder simply
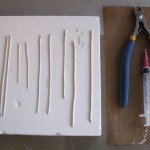 Using the metal clay syringe, extrude several lines of “wire runs”. You will need to snip off the tip to get various gauge diameters. The pink syringe tip is 20g before firing.
Fire to 1650F for 2 hours in a kiln.
Find the “wire run” that is nearest to 18g for step 3.
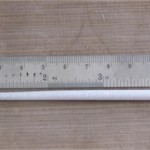 Using silver metal clay, roll out a ball. Cut this ball in half using a tissue blade. Take one half of the ball and using a coil roller or snake roller, roll out a tapered snake.
Tonya’s tip: if your snake is starting to dry out and you have cracking, simply use a bit of water on your finger or brush to coat the snake, let it absorb into the clay and then repeat before step 3.
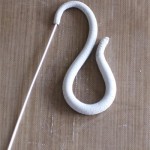 After shaping the metal clay coil into the desired S pipe-like shape, using one of your new “wire runs”, insert it into the small end of the fresh snake.
Repeat step 3 to make the matching earring with the other half of the clay ball.
Tonya’s tip: Cracking can be easily removed by using a small amount of water, a clay shaper and a circular motion. You will create slip which will be pushed into the cracks. Then using your finger, wipe over the area, which should make the cracks disappear.
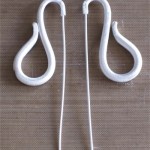 After these earrings are dried and perfected, place into the kiln and fire to 1650F for 2 hours.
Anne does not file prior to firing. After firing, she uses sanding boards to remove any imperfections. Many of the imperfections can be smoothed out prior to firing with a little water and your finger or clay shaper.
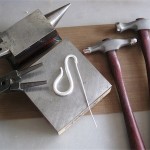 Using a bench block, small anvil, and texturing ball peen hammers, texture each earring.
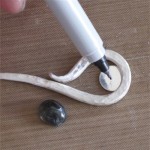 Using small fine silver disks, place them at the bottom curve to determine placement and how much material will need to be removed. File and cut to fit.
 Solder the disk to the metal clay fired earring using a torch and easy solder paste.
Repeat both steps for both earrings.
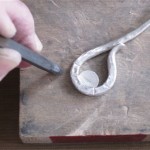 Now add some detail using a file and a punch to give the earrings some textured pattern.
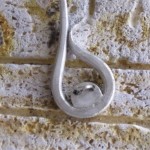 Drill into the disk in two spots to fit a loop of wire. Solder that wire into place.
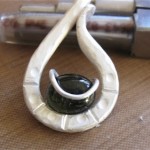 Using a larger barrel wire mandrel, roll the loop over toward the textured side of the earring. Place the stone into the setting and finish locking the cabochon in place with wire.
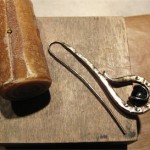 Fine tune the wire that goes through the ear, with your barrel wire mandrel tool. Then using a hard piece of wood or nylon, and a rawhide hammer, gently tap the ear wires to harden them.
Patina with liver of sulphur and polish back using the Pro Polish pads.
Anne’s earrings certainly would be fun to wear and efficient to make! I hope she has inspired you too! This project makes me realize that metal clay, or jewelry making for that matter, does not have to be complicated. Sometimes we need a project that allows us to have a sense of completion quickly and to look beautiful, all in the same morning. So why not make yourselves a pair of fantastic earrings today!
Each of these Master Muse class tutorials exposes new techniques to even the most seasoned of instructors and makers. I’m always surprised at how differently each artist approaches a challenge and how their skills allow them to execute a creative result. I learn at least one valuable shortcut or new technique in each tutorial.
These are affordable classes that you can take in your studio, at your pace, with all the details and more that you would get in a live class. Not to mention that they are scrupulously edited and if the details aren’t there, I ask for more info and pictures.
Don’t forget to leave a comment. Our artists would really like to hear from you. They’ve put a lot of work into sharing their artistry and gifts with the readers. Share with us your thoughts and whether it will inspire you to make one similar, or like it.
Our next blog FREE give-away will be a mystery grab bag of goodies. Your odds are pretty darn good at winning so don’t be shy and participate in the discussion (and in our tribe).
How to win? Leave a comment on every blog (even older posts) or get two entries for tweeting, putting it on Facebook, the Metal Clay Yahoo Gallery forum, your blog etc. Just send us a copy of the link to support@wholelottawhimsy.com! Let your friends know how to make their Wednesday’s rock…. with of course, the Master Muse Tutorial launch!
Anne Mitchell started her creative career over 20 years ago as a professional lighting designer. Looking for another outlet for her artistic energies, Anne began teaching chain making and metal working approximately eight years ago for just pure enjoyment. During those years, Anne found that the creative outlet provided by teaching, as well as a consistent demand for her classes was too alluring to deny. Leaving lighting behind in 2003, Anne is now a full-time designer, teacher, and author. Her classes always sell out at the Bead & Button Show. She was the recipient of Bead and Button’s Excellence in Bead Artistry in 2009. She is a dynamic teacher who always pushes the technical and artistic limits with her designs.
Check out Anne’s work at www.AnneMitchell.net. She is teaching at many different venues. Treat yourself to one of her classes!
Photo credit: final piece Drew Davidson; step-by-step Anne Mitchell


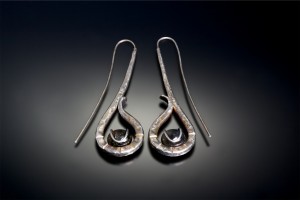


Cute earrings, and what a clever way to set the stone! Thanks Anne & Tonya!
I love the flowing lines of these earrings, gorgeous design. I like the look even without the stone! Wonderful as always.
Very elegant, thanks for the inspiration on mixing metal techniques!
Very eye catching design. Thank you for sharing those step by step photos!
I am new to silver clay, but these earrings are great and I am inspired to try something similar. Thank you for the very good directions.
Nancy, Anne Mitchell is an awesome teacher, you should come to Montana and take her classes in July, you can stay free at cousin Hollie’s
I’m going to try these with a little variation… good inspiration!
These look great. Maybe even I could do them!!!
Now that’s truly innovative!
I like the combo of the smooth swirl of the earring with the rougher texturing. And the unique gem setting adds a lot of interest. Thanks,
Paddy
I love the idea of using extruded clay to make the wire.
Interesting new technique of extruding metal clay to make wire. I like the smooth flowing design of the earring and this stone setting technique is new to me.