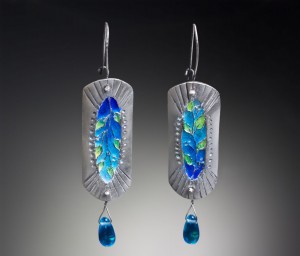
Vickie shares with us a quick synopsis of the steps she takes to create her colorful and fabulous earrings!
We hope the tutorial will serve to inspire you to create! No matter if you just get out your sketch book and draw a similar project based on these challenges. It’s a place to start. It’s a way to start off your day in the right frame of mind with a creative exercise!
Vickie says “For a burst of brilliant color in your metal clay jewelry, try enamel. Cloisonne is a traditional decorative technique for enameling on metal, where small compartments (cloisons in French) are created by attaching fine wires to a backplate. The compartments are then filled with kiln-fired vitreous enamel, applied as finely ground particles of glass by a method of wet packing. Syringe type metal clay offers the perfect tool to easily construct cells in complex patterns onto a metal clay support.”
If you are interested in the full step-by-step tutorial please stay tuned. It will be available at Whole Lotta Whimsy. They will be in a handy bench format too! This tutorial looks like it will be over 60 pictures with tons of detail in this #48 Tutorial!
In this tutorial you will learn:
- How to build layered metal constructions for depth and design cells
- How to use syringe for cloisonné
- How to wash and wet-pack enamels
- How to kiln fire enamels
- How to make handmade ear wire findings
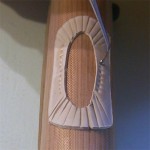
 Roll out the lightly lubricated metal clay, sandwiched between two pieces of tear-away texture or low relief texture.
Using the earring template created from card stock, cut out the matching oval shapes and place to dry on the roller covered in teflon.
Vickie shares lots of great tips for keeping the clay from drying, creating the template and more in the full tutorial.
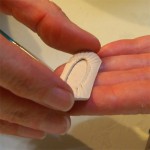
 Roll out more metal clay and cut out the same overall shape. Then using a needle tool or craft knife, cut out the inner oval from the card stock template you made. Remove the excess material.
 Using a straight edge and a ball burnisher, add texture to the clay.
Allow to dry and then using a sanding board, smooth and refine the inside edge of the front pieces.
 Join the two pieces together with water and make sure they are aligned with no gaps.
Dry and sand.
Drill holes at the top and bottom center with a small drill bit and pin vise.
 Draw your design on the metal clay. Extrude the lines, using the metal clay syringe.
Nestle the earrings in a bowl of vermiculite and fire in a kiln to 1650°F for two hours.
Tumble for 1-2 hours with stainless steel mixed shot.
Vickie shares in the full tutorial how to store the syringes, hold the syringe, extrude the lines, shape the syringe lines and attach them to the surface.
 Using the transparent enamels, scoop out the color into a palette. Transparent enamels require washing to extract the fines, which will cloud the enamels if not removed.
Make sure you take proper and necessary safety precautions such as wearing a particulate mask when working with enamels. Even though these are lead-free, they are dusty glass particles.
 Using a fine tip paintbrush (0 or 3/0) pick up a few grains and place them into each point of the leaf. Add and layer different colors to create depth and shading.
Dry on a metal clay dryer or air dry.
 Add in the background colors working from one color to the next, subtly adding gradation.
Dry again and remove any stray grains.
 Stilt on a trivet and load into the hot kiln. You can set your kiln at 1450°F-1500°F. Opening the door will lower the temperature.
Make sure to wear Safety Shade 2.5 eyewear to protect your eyes from the IR damaging rays.
Repeat the enameling steps if the cloison cells need more enamel. Enamel fuses, it does not melt. So there are usually meniscus at the edges, so 2 or more firings are usually required. Vickie covers enameling in more detail in the full tutorial.
 Insert the doubled end of the wire through the earring with the ball in the front.
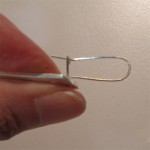
 Bend the wire around the wire wrap mandrel to make nice loops. Using needle nose pliers, bend the short wire to form a catch.
Use a wire rounder to remove the sharp edge at the end of the cut wires.
Work harden the wires using a bench block and chasing hammer.
 Patina and then using a 3M bristle disc polishers, remove the excess patina. Using a fine burnisher, shine the syringe wire lines between the enamel cells.
Vickie creates beautiful nature-inspired pieces. They exude the joyful color you can only usually find in the beautiful outdoors! Her designs are masterful.
Imagine doing this project with cloisonné wires. Bending and shaping each piece of wire and firing it into a clear enamel base. It would be tedious and time consuming. No wonder cloisonne is so expensive! The syringe, once mastered, can provide perfect lines for defining the enamel.
Each of these Master Muse class tutorials exposes new techniques to even the most seasoned of instructors and makers. I’m always surprised at how differently each artist approaches a challenge and how their skills allow them to execute a creative result. I learn at least one valuable shortcut or new technique in each tutorial.
These are affordable classes that you can take in your studio, at your pace, with all the details and more that you would get in a live class. Not to mention that they are scrupulously edited and if the details aren’t there, I ask for more info and pictures.
Don’t forget to leave a comment. Our artists would really like to hear from you. They’ve put a lot of work into sharing their artistry and gifts with the readers. Share with us your thoughts and whether it will inspire you to make one similar, or like it.
Our next blog FREE give-away will be a mystery grab bag of goodies. Your odds are pretty darn good at winning so don’t be shy and participate in the discussion (and in our tribe).
How to win? Leave a comment on every blog (even older posts) or get two entries for tweeting, putting it on Facebook, the Metal Clay Yahoo Gallery forum, your blog etc. Just send us a copy of the link to support@wholelottawhimsy.com! Let your friends know how to make their Wednesday’s rock…. with of course, the Master Muse Tutorial launch!
Bridging many medias, Vickie Hallmark pursues her artistic muses in whichever direction calls: metal, glass or fiber. This cross-pollination of different ideas, coupled with her experimental nature as a research scientist, leads Hallmark to combine materials in novel ways. Metal over glass is a particular fascination, be it electroformed copper over lamp worked beads or silver clay formed around enameled-painted tiles.Over the last decade, Hallmark’s work has been exhibited in prestigious juried fine craft shows, including Craft Forms, Crafts National, and Materials: Hard & Soft. Chosen as a Glasscraft Emerging Artist in 2007, images of her beads have appeared in The Flow, The Glass Bead, and Bead Release 3, an annual compendium of the year’s best beads. Metal Clay Artist and Metal Clay Today have showcased her metal clay jewelry. The best of Hallmark’s creations are preserved in both private and museum collections.
Check out Vickie’s work at www.VickieHallmark.com. You can purchase her work online! Contact her for more details.
Photo credit: final piece Drew Davidson; step-by-step Vickie Hallmark


Beautiful earrings !!
Beautiful earrings, Vickie, and great project! I love enamels and have been wanting to work with them on metal clay. This may be the project to get me going in that direction. Thanks!
Just beautiful Vickie! I love that you created a domed surface for the earrings. It adds so much to the design. Brava!
Lovely earrings and great explanation on how to make them!
These are absolutely gorgeous earrings, and based on even these high-level instructions, I’m sure the tutorial will be outstanding! I’m dying to try an enameling project.Thanks, Tonya and Vickie!
I’ve bought enamels but haven’t had the courage to try them on metal clay yet. This inspires me to do so. I have Vickie’s first tutorial (and a few others) and I love it!
Vickie, the earrings are simply gorgeous! I love the colors that you have chosen!
I like the construction technique and artistic effect of a frame around the enameled center oval.
As always the Master Muses inspire! Vickie I really like this technique & of course all of your work.
Beautiful earrings! Enamels add such a nice color demension with out overwhelming the silver. Great advice on how to achieve the graduated coloring!
I have been swooning over Vicki’s work for awhile now!
Thanks for sharing this info. I have taken a wonderful enamelling class with Pam East and am setting up the enamel area in the studio…this gave me the push i needed, Wonderful, thanks very much.
Just getting into torch fired enamel but was wondering how to make the cells on my PMC pieces. The syringe is so obvious I didn’t see it. Thanks for the information. I will try it soon in the kiln.
I love the earrings and the colors of enamel you have added. I have very little experience with enameling on metal clay. Thanks for the technique ideas. You have inspired me to do some more.