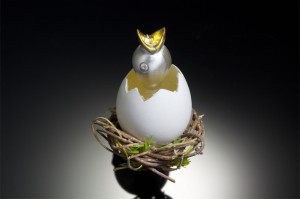
 Ruth shares with us a quick synopsis of the steps she takes to create her whimsical metal clay brooch. Just in time for the Easter holiday. What a joyful piece!
We hope the tutorial will serve to inspire you to create! No matter if you just get out your sketch book and draw a similar project based on these challenges. It’s a place to start. It’s a way to start off your day in the right frame of mind with a creative exercise!
Ruth says “It’s springtime and time to “break out”. Each year in the fall I like to go into the garden and gather up the “used” birds’ nests and eggs. I leave them outside and each spring, the birds come and use the twigs from the old nests to make new ones. Good recycling. This project utilizes one of the bird’s eggs that I found last year. The jacket pin shows a silver bird, just coming out of his egg in a nest. I lovely reminder for us to break out! And as with all baby birds, they have seemingly large mouths that seem to glow a golden color, and thus I added some gold to his beak using keum boo.”
If you are interested in the full step-by-step tutorial please stay tuned. It will be available at Whole Lotta Whimsy. They will be in a handy bench format too! This tutorial looks like it will be over 65 pictures with tons of detail in this #51 Tutorial!
In this tutorial you will learn:
- How to sculpt silver metal clay
- How to work with a found object (strengthen, clean, sculpt)
- How to use fine silver as an engineering piece
- How to use resin
- How to fire and sand metal clay for a beautiful finish
- How to make a custom pin back for a brooch
- How to Keum Boo Gold onto silver
 Secure a small bird egg. If you find it in nature, you will need to cut it open and clean it out. Using your flexshaft and a cut off disc, open the top of the egg. Rinse completely.
Remember safety and always wear a mask and glasses when using your flexshaft or when cutting into materials.
 Mix up resin, to strengthen the egg. Ruth shares every step of using the Ice Resin in her full tutorial.
Tape up the hole and then coat the inside of the egg. Do not fill it up at this stage. Allow to dry a minimum of 6 hours.
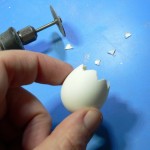 Again using the flexshaft and cut off discs, cut your shape into the egg.
Make sure you wear your mask and glasses.
 Roll out a small ball of silver metal clay and form into the shape of the bird’s head. A smaller ball will be shaped into the beak.
Ruth recommends first making this out of polymer to assure fit and size before sculpting metal clay.
In the full tutorial Ruth shows detailed sculpting techniques she uses to make each shape and join them.
 Create the bird’s eye and finish sculpting the beak.
Insert fine silver wires that have been pre-notched into the head/neck area.
Sand the head carefully using the 3M sanding pads and Slim Sanding Sticks.
 Decide on which side of the head will be the front side. On the back side, sand a spot flat using a sanding board.
 Roll out a small piece of metal clay, pierce it with a needle tool to make a tube and allow to dry fully on the metal clay dryer.
Attach to the flat back side of the bird head.
Ruth shows detailed steps on how to do this seamlessly in her full tutorial.
Fire in a kiln to 1650F for 2 hours.
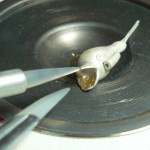
 Apply 23.5K Gold Keum Boo foil to the bird’s beak. The Ultralite with the Brass Domed Insert is used for this project.
Ruth includes all the steps for cutting the gold, using the Ultralite and performing the Keum Boo technique in the full tutorial.
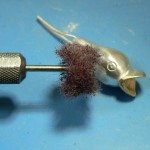 Brass brush the bird. Then using sandpaper and a slotted mandrel sand first with a flex shaft and sandpaper. Finish up with a mini fiber wheel to give it a beautiful satin effect.
 Using base metal wire, create a stick pin by sharpening one end and balling up the other with a torch. Insert the stickpin upwards into the tube. Bend the pin to 90 degrees at the top of the tubing. Create a second 90 degree bend.
 Make sure the bends of silver wire extending from the bird will fit into the egg.
Mix and pour resin into the egg shell until nearly full. Try to coat the sides once again to add strength as well.
Insert the bird and make sure he is secured while the resin sets up for a minimum of 6 hours.
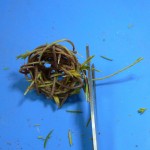 Create a beautiful nest for the egg to sit upon using twigs still in the partial green stage. This will take 5-6 varying sizes of circles. Then weave them together to create the nest. Ruth shows each step in the full tutorial.
Using Devcon 5 Minute Epoxy, cold connect the nest to the base of the egg. Trim off any bits of nest sticking out near the back close to the pin.
Allow this to set up for 3 full days before selling or wearing!
Now it’s time to Break Out!
I just love to receive Ruth’s projects. Always delightful, fun and full of whimsy! Her projects are inventive,creative and surely will get your creative juices flowing too. There is nothing quite like putting a smile on someone’s face. Her pieces make me chuckle and want to run through the tulips! These are great gifts to make or buy for someone you know.
Each of these Master Muse class tutorials exposes new techniques to even the most seasoned of instructors and makers. I’m always surprised at how differently each artist approaches a challenge and how their skills allow them to execute a creative result. I learn at least one valuable shortcut or new technique in each tutorial.
These are affordable classes that you can take in your studio, at your pace, with all the details and more that you would get in a live class. Not to mention that they are scrupulously edited and if the details aren’t there, I ask for more info and pictures.
We’d love to see you take the challenge and make this or a similar piece as well. Can’t wait to see your pieces. Send them and we’ll post pictures in a future Challenge Gallery. Challenge yourself!
Wanna win FREE tools, supplies and books? Really FREE…no strings attached!
It’s easy, leave a comment on every blog (even older posts) or get two entries for tweeting, putting it on Facebook, the Metal Clay Yahoo Gallery forum, your blog etc. Just send us a copy of the link to support@wholelottawhimsy.com of where you posted it! Your odds of winning are pretty darn good too!
Ruth Baillie started making metal clay jewelry in 2005. Her creations always begin from a positive emotion. She hopes the wearer will feel this energy, thus creating jewelry that adorns and also lifts your spirits. Certified in metal clay, she has also studied Silver Smithing at Revere Academy of Jewelry Arts and other art/jewelry schools. She has exhibited in several juried competitions, receiving awards for her silver clay creations. Her work has appeared in PMC Guild Annual, Sonoma Magazine and Art Jewelry Magazine. In addition, she has written step-by-step projects for LJAJM. She is a member of: Society of North American Goldsmith, PMC Guild and Art Clay Society. Ruth works from a home studio in Northern California, where she and her husband grow Merlot grapes. They share the vineyard with their parrot, Harold and many other birds. These birds are a great source of inspiration for Ruth’s Birdland Creations.
Check out Ruth’s work at www.BirdlandCreations.com. You can purchase her work online as well!
Photo credit: final piece Drew Davidson; step-by-step and two views of finished Ruth Baillie




Too adorable!
I love this Ruth. such a sweet reminder of spring.
That is super cute, I LOVE it!
Ruth, this is sooooo sweet! Love it!
How do I find the full tutorials? I have never found them for any of the challenges but would love to try them.
Hi Katherine,
The full tutorials can be found here:
http://www.wholelottawhimsy.com/wo/content/shopping/catalog?s=5285135
We are getting ready to launch something very exciting this summer regarding the full tutorials for the Master Muses. Stay tuned to the blog and you might want to sign up for our ezine here:
http://www.wholelottawhimsy.com/wo/content/newsletter
Cheers,
Tonya
This is just the sweetest little bird, Ruth ! Great idea and tutorial !
o:-)
Super Cute !!! Love it !
Thanks for your lovely comments. It was been a wonderful opportunity to participate in the Master Muse – and like this last piece- has been an opportunity to “break out”.
I adore Ruth Baillie’s work – this project is too cute!
What a unique idea!